

In step 3 of Add analysis, 地図上で条件を設定 (Set conditions on map) opens a full-screen map editor. What you set on the map depends on the analysis. This chapter covers each analysis in turn, then the building tools every analysis shares.
What each analysis needs on the map
| Analysis | Set on the map | Required | Optional | 確定 (Confirm) is enabled when |
|---|---|---|---|---|
| Ground shadow | Analysis area (rectangle) | Area | Add, exclude buildings, IFC | The area is 25 ha or less |
| Wall shadow | Buildings to check | At least one building | Add, exclude buildings, IFC | At least one building is selected |
| Noise | Area and noise sources | Area, one or more sources | Barriers, add, exclude buildings, IFC | Area is 25 ha or less and there is a source |
| Wind | Centre point and wind | Centre point | Add, exclude buildings, IFC | There is a centre and the inputs are valid |
The screen
- Left panel: what you have set (area coordinates, chosen buildings, sources, added and excluded buildings and so on).
- Tool buttons at the top left of the map: switch tools. Which buttons appear depends on the analysis.
- Hint at the top of the map: how to use the current tool.
- 確定 at the top right: sends what you set back to Add analysis. Nothing is calculated yet; that starts with 計算開始 (Start calculation) on the main screen.
- × at the top left: closes without confirming; what you set on the map is not applied.
Ground shadow: draw the area
The tools are 解析範囲 (Extent), 建物追加 (Add buildings), 建物除外 (Exclude buildings) and IFC. The extent tool is selected when the editor opens.
- Press 範囲作成 (Create area) and click-and-drag a rectangle on the map.
- Drag inside the rectangle to move it, a corner to resize it, or the rotation handle to rotate it. To set an exact angle, type it in 角度 (Angle) and press 回転 (Rotate).
- The size is shown as "Area: X ha". Above 25 ha it turns red with "⚠ Exceeds maximum area!". 確定 is then disabled, so keep it within 25 ha.
- 範囲リセット (Reset area) starts over.
The coordinates of the area are shown, but you cannot create the area by typing numbers.
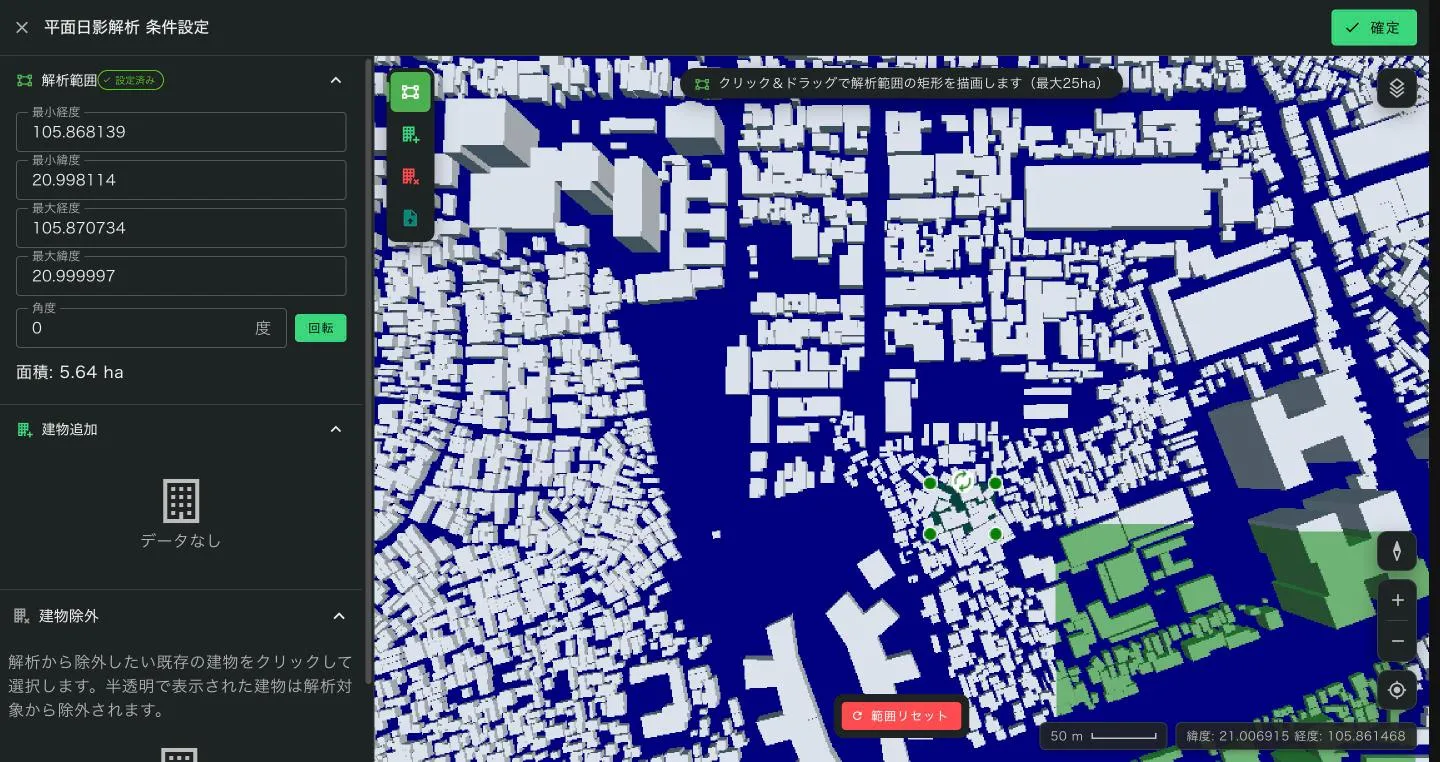
The target building area, where buildings casting shadows are collected, is set automatically: the analysis area widened by 100 m on every side. Shadows from buildings outside it are not computed.
Wall shadow: choose the buildings
You don't draw an area. The tools are 予測対象建物選択 (Select target building), Add buildings, Exclude buildings and IFC Upload.
- Choose 予測対象建物選択 and click the buildings to check. Selected buildings turn orange; click again to deselect.
- To check a planned building, draw it first with Add buildings, then make it a target from the 新規 (New) list.
- Selected buildings are listed under 選択済み建物 (Selected buildings), tagged Existing or New. The bin icon removes one; クリア (Clear) removes all.
- Once at least one building is selected, 確定 is enabled.
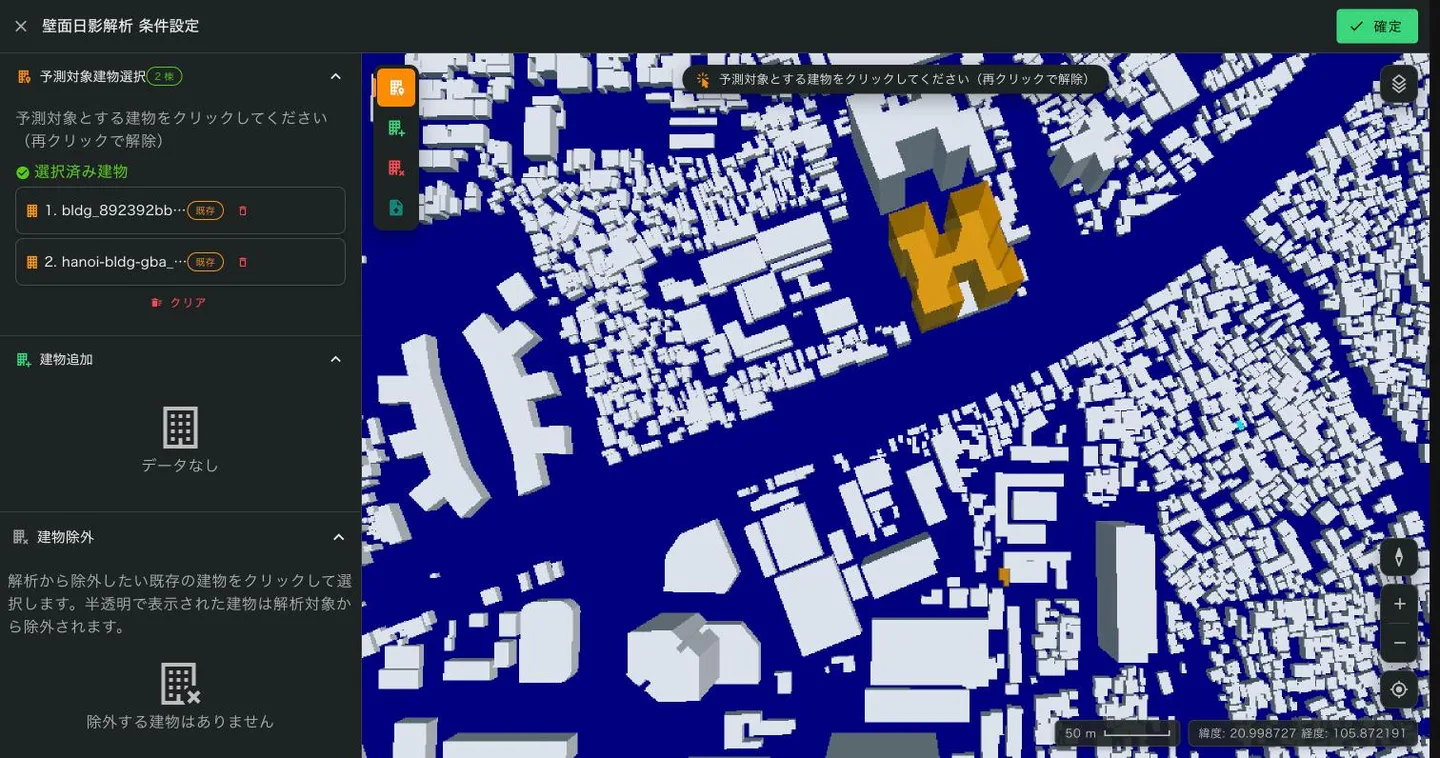
The analysis area is set automatically around the selected buildings. A building chosen as a target cannot be excluded.
Noise: area, sources and barriers
The tools are Extent, 騒音源 (Noise sources), Add buildings (optional), Exclude buildings (optional), 遮音壁 (Barriers) and IFC. The other tools stay disabled until the area is drawn. Set things in this order:
- Area: draw a rectangle as for ground shadow (drawing the area). Above 25 ha, 確定 is disabled.
- Noise sources: place at least one (below).
- Barriers: place them if needed (below).
- Add, exclude buildings, IFC: if needed (shared tools).
Placing noise sources
The first time you choose 騒音源 you pick the source type. All sources in a case are the same type.
- Construction machinery
- Sources based on the Acoustical Society of Japan construction noise model (ASJ CN-Model 2007). Choose a machine from the list.
- General
- Set the sound power level and height freely. You also set the centre frequency.
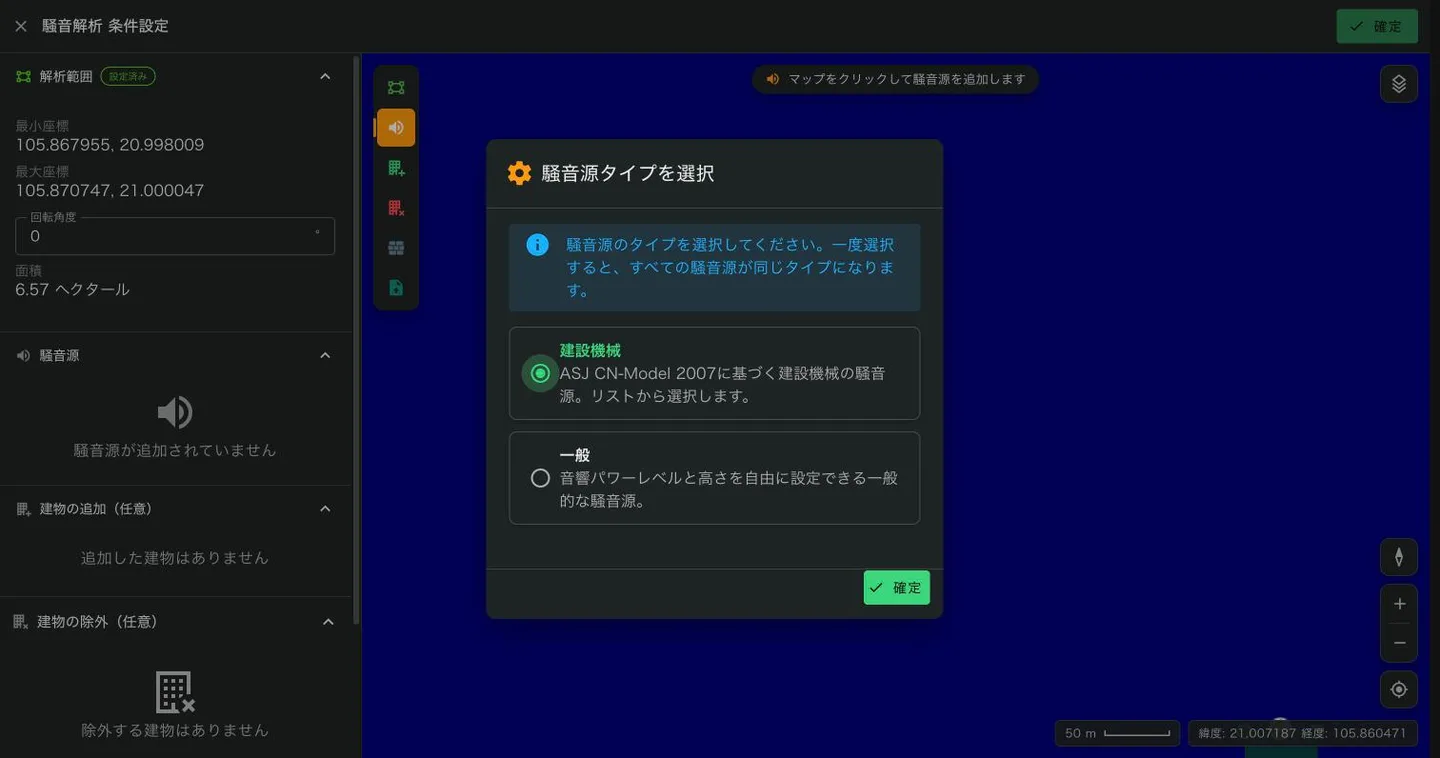
Changing the type later (騒音源タイプを変更, Change noise source type) deletes every source already placed.
Click the map to place a source; its settings open. Clicking a rooftop adds the roof height.
| Item | Allowed | Meaning |
|---|---|---|
| Select machinery | From the list | Type of machine; sets the sound power level and height |
| Sound power level (Lw) | 0.1–200 dB | How loud the source is. Default 100 dB for General |
| Height above ground | 0–999 m | Height of the source. Default 1.5 m |
| Coordinates (lon, lat) | — | Position; you can also drag it on the map |
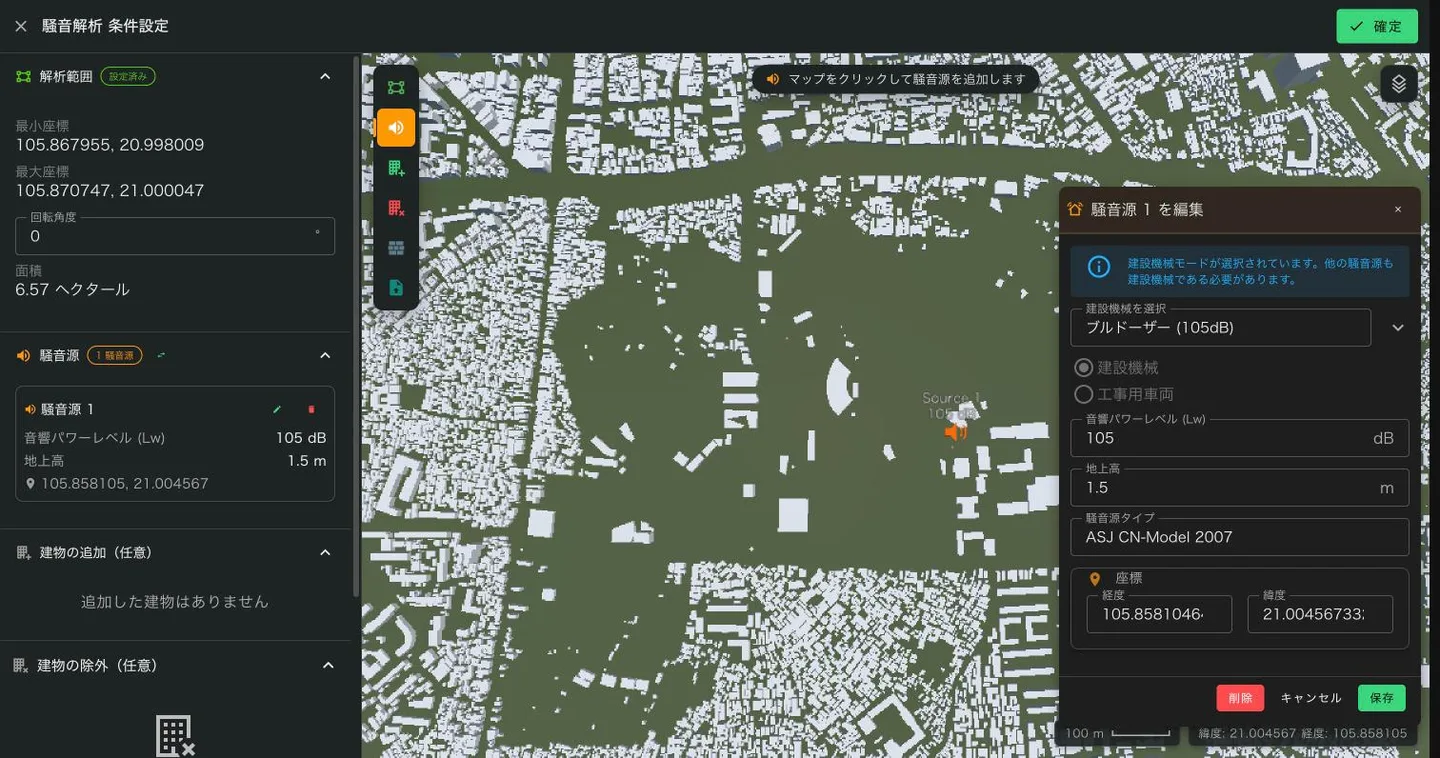
Machinery and sound power levels:
| Machine | Lw |
|---|---|
| Bulldozer | 105 dB |
| Backhoe | 106 dB |
| Crawler crane | 107 dB |
| All-casing drilling machine | 107 dB |
| Road roller | 104 dB |
| Asphalt paver | 107 dB |
| Concrete pumping vehicle | 107 dB |
| Concrete mixer truck | 100 dB |
| Dump truck | 102 dB (height 0 m) |
| Others | Set your own |
With a listed machine, Lw and height are fixed. Choose その他 (Others) to enter them yourself and to pick construction machinery or construction vehicle.
保存 (Save) confirms and キャンセル (Cancel) reverts. Placed sources can be edited or deleted from the list on the left.
Placing noise barriers
- Choose 遮音壁 and press 新しい遮音壁の作成 (Create new barrier).
- Click points along the wall on the map (two or more). Drag a point to move it; click it to remove it.
- Right-click or press 確定 (Finish).
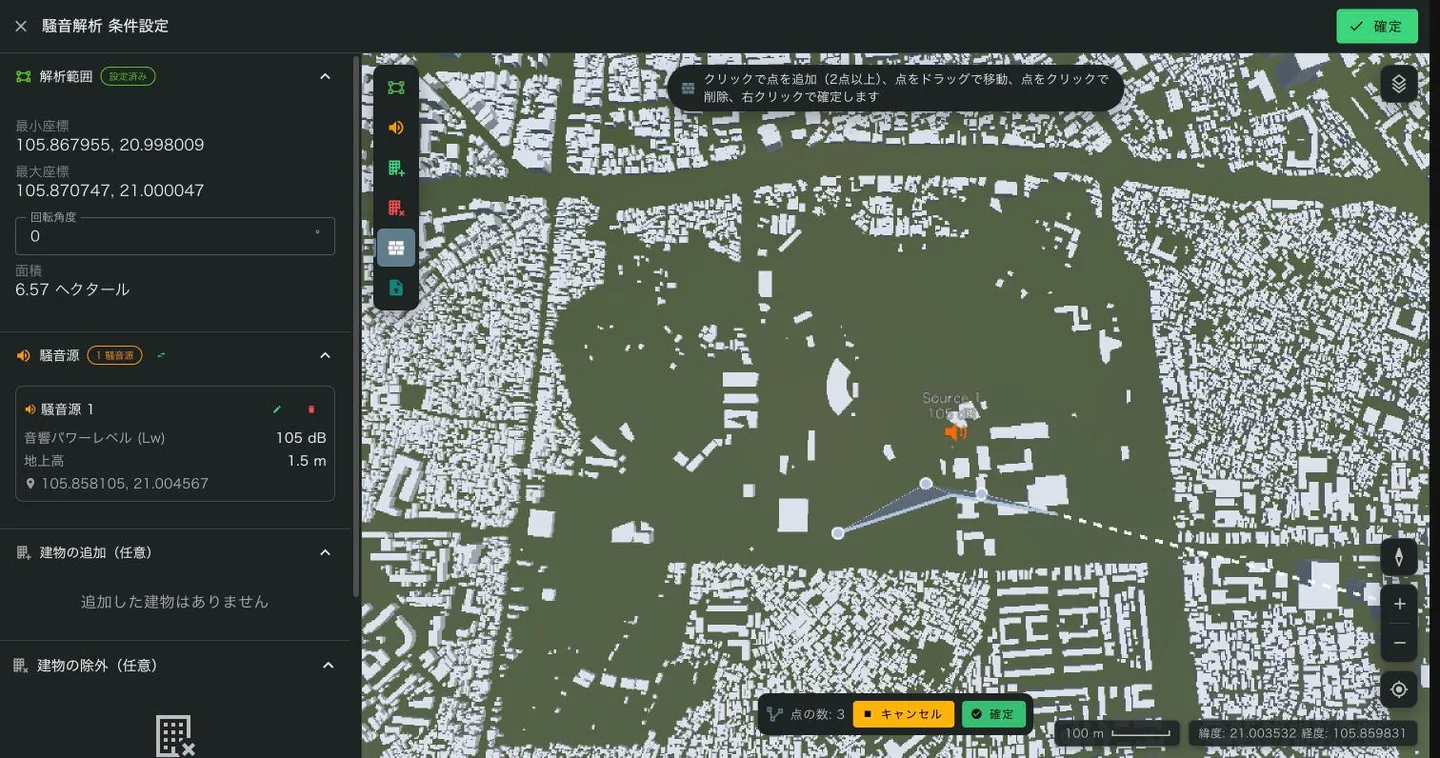
Each point is 2 m high by default; clicking a rooftop adds the roof height.
To edit later, click the wall on the map or the pencil icon in the list.
- Move point
- Drag a point. Drag a segment midpoint to add a point. Click a point to change its height.
- Move whole barrier / Rotate
- Move the wall as a whole, or drag the ring to rotate it.
- Delete point
- Click a point to remove it (minimum two).
- Point heights
- Enter a value in 一括高さ設定 (Uniform height) and press 全点に適用 (Apply to all points) to give every point the same height (0.1–999 m), or set each point separately.
Wind: centre point and wind
You pick a centre point instead of drawing an area. The tools are 中心 (Center), Add buildings, Exclude buildings and IFC. The wind conditions are also set in this screen's left panel.
- Choose 中心 and click the centre of the analysis on the map, or type it into Center longitude and Center latitude on the left.
- A 200 m square around it (cyan) and an arrow for the wind direction appear. The square turns with the wind direction.
- In the left panel, set wind direction, wind speed, reference height, receptor height and roughness category. See wind conditions for what each means.
- Add, exclude buildings or bring in IFC if needed, then press 確定.
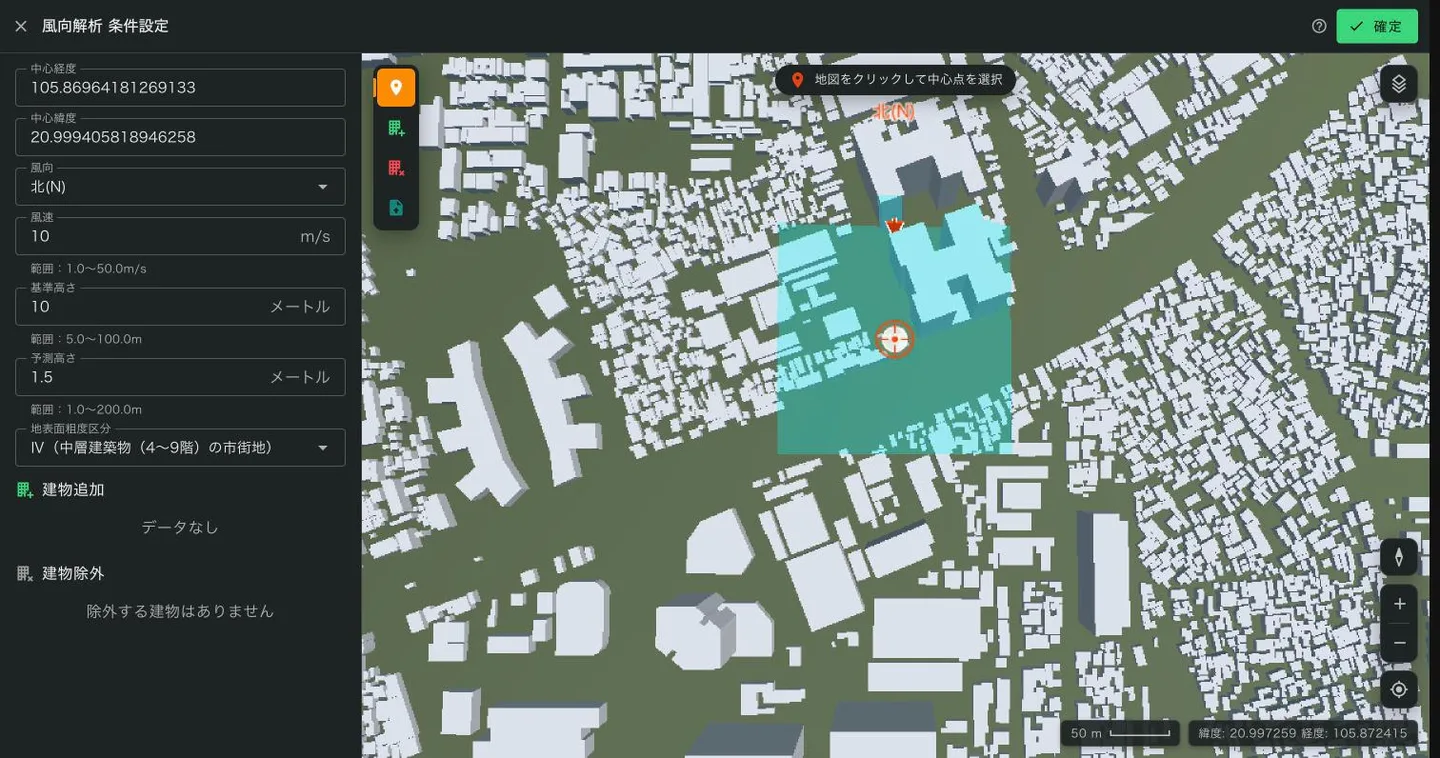
Pressing 確定 without a centre asks you to click the map to choose one. If there is no building data within 200 m of the centre, "No building data" appears; pick a place with PLATEAU data or add buildings. A detailed guide is under 操作ガイド(PDF) (Guide, PDF) at the top right.
Adding planned buildings
Draw buildings that don't exist yet and include them in the analysis.
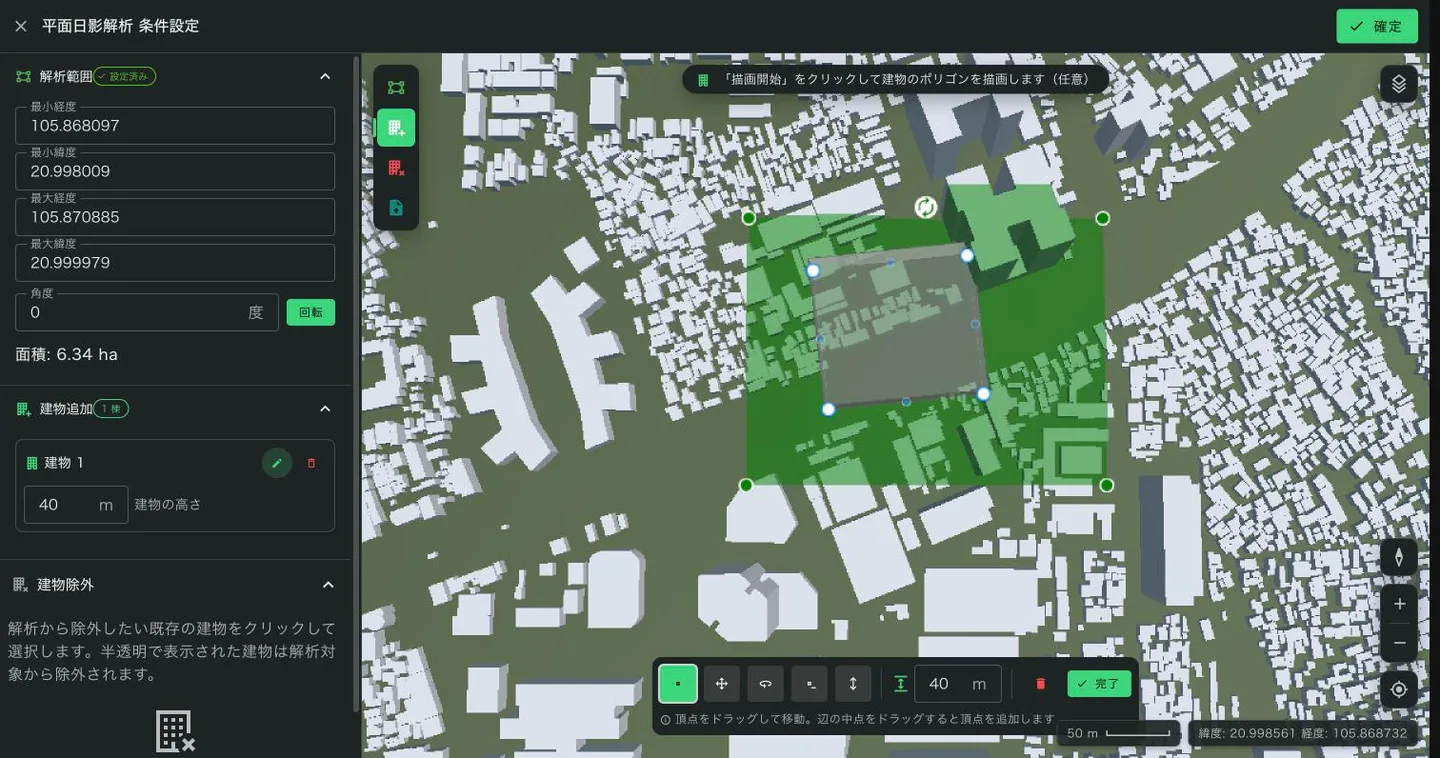
- Choose 建物追加 (Add buildings) and enter 建物の高さ (building height, 1–500 m, default 10 m).
- Press 描画開始 (Start drawing) and click the building's corners on the map in order.
- After three or more points, right-click or press 確定 (Finish). An outline whose walls cross is rejected with "The building walls intersect".
Added buildings are listed as "Building 1", "Building 2"…, and their height can be changed in the list. To reshape one, click it on the map or press the pencil icon in the list.
- Move vertex
- Drag a vertex. Drag an edge midpoint to add a vertex.
- Move all
- Drag the centre handle to move the whole building.
- Rotate
- Drag the rotation handle.
- Delete vertex
- Click a vertex to remove it (minimum three).
- Adjust height
- Drag the green handle up or down.
Press 完了 (Done) when finished. The bin icon deletes a building straight away, without asking.
Excluding existing buildings
Leave out buildings that will be demolished, for example.
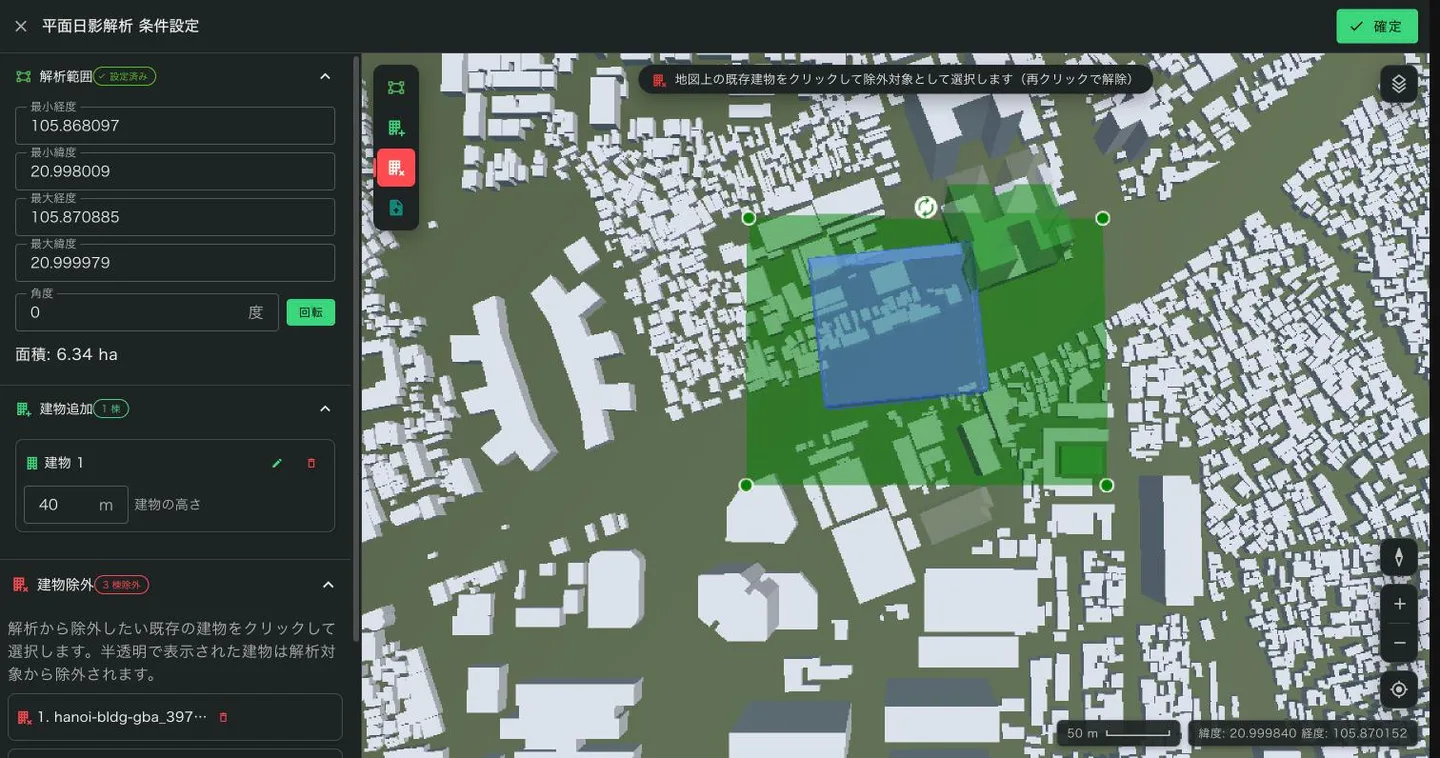
- Choose 建物除外 (Exclude buildings) and click buildings on the map. Excluded buildings turn translucent.
- Click again to bring one back.
Excluded buildings are listed; the bin icon restores one and クリア (Clear) restores them all. In wall shadow, a building chosen as a target cannot be excluded.
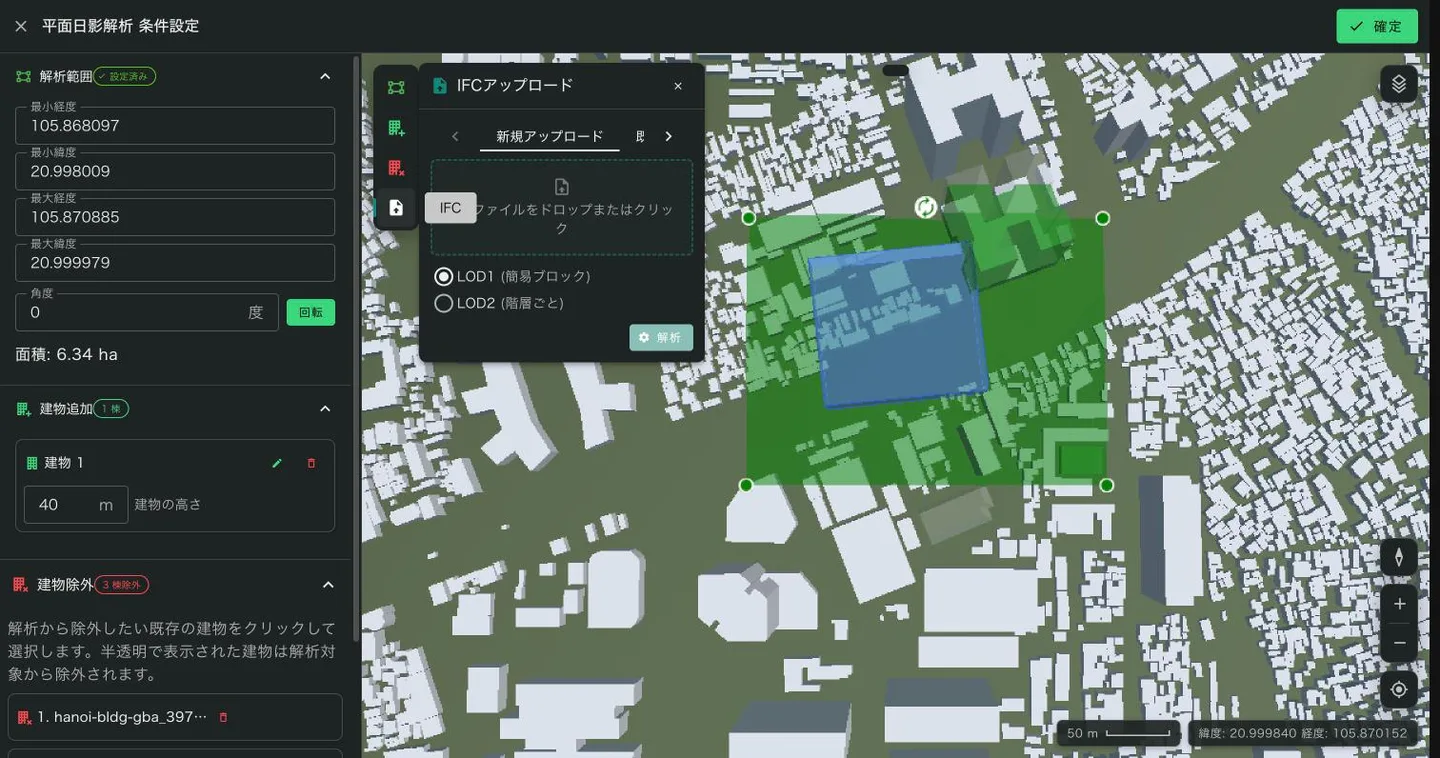
Using an IFC building
Bring a building you are designing into the analysis from IFC.
- Choose IFC. For a new file, pick an
.ifcon the 新規アップロード (New upload) tab; for one already in the project, use 既存データから (From existing data). - Choose the detail level. LOD1 (simple block) brings the building in as one block; LOD2 (per storey) keeps the shape of each storey.
- Press 解析 (Parse). Progress shows "Loading IFC…" and "Analyzing geometry… %", then 3D previews of the original and the imported shape appear side by side; drag to orbit. Height and building count (and storeys for LOD2) are shown.
- Place it. If a position was saved, choose 保存された位置 (Saved position) or 地図でクリック (Click on map); otherwise click the map.
Buildings imported as LOD2 can only be moved and rotated, not reshaped or raised. やり直す (Start over) begins again.
If no building shape is found, "Could not detect any building geometry in the IFC file" appears. How to export IFC from Revit, Civil 3D or AutoCAD is explained under "マニュアル・ドキュメント" (Manuals) on the product home page.